Did you know that Canvas has an API that allows users to interact with Canvas using code? While most users use the Canvas website to develop teaching materials or as students, to submit assignments, access grades, and so forth, the Canvas API allows you to do the same things with code and to create useful tools that expand the functionality of Canvas.
All UBC students, faculty, TAs, and staff are able to access the Canvas API simply by virtue of having a Canvas account. The types of data you’re able to access through the API depend on your role in Canvas. You will have the same permissions when accessing Canvas through the API as you do when using the Canvas website — that means students, for example, can access things like your class schedule, due dates, and discussion posts, as well as your own grades and assignment submissions.
This guide shows you how to access the Canvas API and make API requests. It’s meant to be accessible to beginners, but having a bit of programming experience may come in handy.
What exactly is an API?
API stands for Application Programming Interface. APIs allow you to interact with an application using code. If you’re not quite sure what that means, check out this explanation.
How do I access the Canvas API?
This next section walks you through the process of accessing and submitting requests to the Canvas API.
Step 1: Generate your Canvas access token
Do not share your access token or submit it to any application not under your direct control. Your access token enables full access to your Canvas user account and is equivalent to your CWL password.
Accessing the Canvas API requires a token, which you can think of as your username and password squished into one long random string. Anything you can do in Canvas can be done by someone else if they have your token, so don’t share your token with anyone else (or ask others to share their token with you)!
Follow these steps to generate your personal access token.
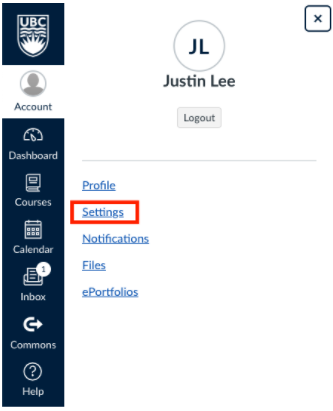
- Log into Canvas at canvas.ubc.ca. Click Account in the left menu, and then click Settings.
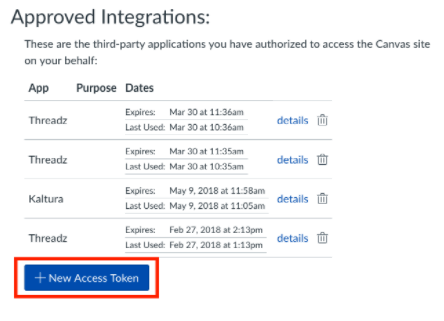
- Scroll to Approved Integration and click + New Access Token.
- Fill in the Purpose field.
- For added security, set an expiry date for your token. This way, if you accidentally share your token or your token is stolen, at the very least it won’t be valid forever.
- Click Generate Token. Now copy your freshly generated token and save it somewhere secure.
One last reminder to never share your token with anyone. If you think your token may have been exposed (for example, by accidentally posting it to GitHub), delete your token from Canvas right away. Instructions for creating and deleting access tokens as a student are available on the Canvas Guides.
Step 2: Make an API request to Canvas
Curl is a command line tool for making requests to URLs and is the simplest tool for making an API request to Canvas. This step shows you how use Curl and the token you just generated to make a request to the Canvas API to display basic information about your Canvas user profile.
- If you’re on a Mac, start by opening Terminal. If you’re using Windows, open Command Prompt. (Note that Windows users may need to install Git for Curl to work properly.)
- Enter the following text, substituting $token with the token you just generated in Canvas (make sure you retain the quotation mark at the end):
curl https://canvas.ubc.ca/api/v1/users/self -H "Authorization: Bearer $token"You should receive a response back that looks like:
{"id":50,"name":"Justin Lee", "created_at":"2017-07-12T10:38:49-07:00","sortable_name":"Lee, Justin", "short_name":"Justin Lee","avatar_url":"https://canvas.ubc.ca/images/messages/avatar-50.png","locale":null,"effective_locale":"en-CA","permissions":{"can_update_name":false,"can_update_avatar":true}If that worked, congratulations! You’ve just made first API request to Canvas. The response you received back from Canvas via the API is in JSON format, which is designed to be readable by both humans and computers.
Step 3: Learn how to make requests to the API using other programming languages
While Curl is a great way to get started with the Canvas API, you may find it easier in the long run to make more complex API requests using programming languages like JavaScript and Python.
You can make the same Canvas API request we just made in Curl with Node.js and JavaScript by following the instructions in this GitHub repository. To make an equivalent request using Python, follow these instructions on GitHub.
Canvas API Resources
Want to learn more about working with the Canvas API? Check out the groups, documentation, and other opportunities that can help you build your skills.
Groups and events
UBC’s Learning Analytics Hackathons offer students an opportunity to work with real learning data and explore how analytics can support learning. Several past Learning Analytics Hackathons have also focused on teaching participants how to access and make requests to the Canvas API. Hackathons are usually held in the fall and spring — stay tuned for upcoming fall 2019 Hackathon dates.
The Canvas Developer Community is an online community for anyone involved in building LTI or API integrations for Canvas. This is a place to ask and answer questions, participate in group discussions, and share resources related to the Canvas API.
Documentation
- The Canvas API Getting Started Guide is a comprehensive resource designed to assist everyone with the Canvas API, from total beginners to seasoned programmers.
- Canvas’s API documentation describes the resources that make up the Canvas API.
- The UBC Canvas API Community (CAPICO) GitHub contains scripts for the Canvas API created by members of the UBC community.
- The Python Canvas API package GitHub repository can help you get up and running with the Canvas API using Python.
- The Node.js Canvas API package GitHub repository can help you get up and running with the Canvas API using JavaScript/Node.js.